About Me

My photo
I'm just a rockabilly gal with a huge passion for makeup, nails, beauty, pin ups, eBay shopping, red, and fluffly stuff. I also love my man and our little family. I'm a Wife, a mother, and beauty school student. I'm pretty busy these days but promise to share my best ideas for nails, hair, and makeup!...

Saturday, December 31, 2011

and a Happy New Year!

Hiya Everyone!
I can’t believe this year has already gone by!  But here it is the last day of 2011. This year has been wonderful year, although it seems to have been the fastest year in history. It started out a little rocky but ended quite swell. I feel like 2012 is going to be a fantastic year! I feel like it’s my time to shine. I’m finally going to begin my career after being accepted to the Paul Mitchell School here. This is such a passion of mine and I am definitely looking forward to this! and...

I’m ready to bring in the New Year with a new nail design!

It sort of reminds me of lace or saddle shoes haha. 
I just threw a couple coats of white, then painted the tips red  in a heart shape type of thing, used a small paint brush to dot some red above it. I like it! It’s different and kind of cute! Go ahead try it out!

Wishing everyone a Happy New Year!


Photobucket

Tuesday, December 27, 2011

Are you ready for this...

Hiya!
I hope everyone had a great holiday! 
There are a couple of subjects I’ve got going on today, nails and hair.
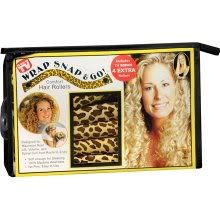
So lets start with the hair… I’ve been eyeing these rollers for a while now I finally gave in and bought them and I’m so glad I did. They are called wrap snap & go rollers.
They are around $10 @ Walgreens
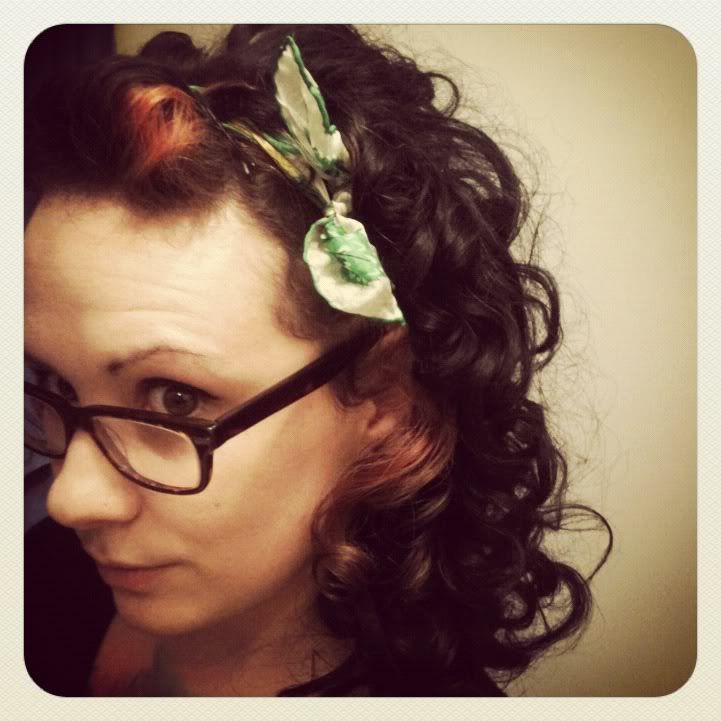
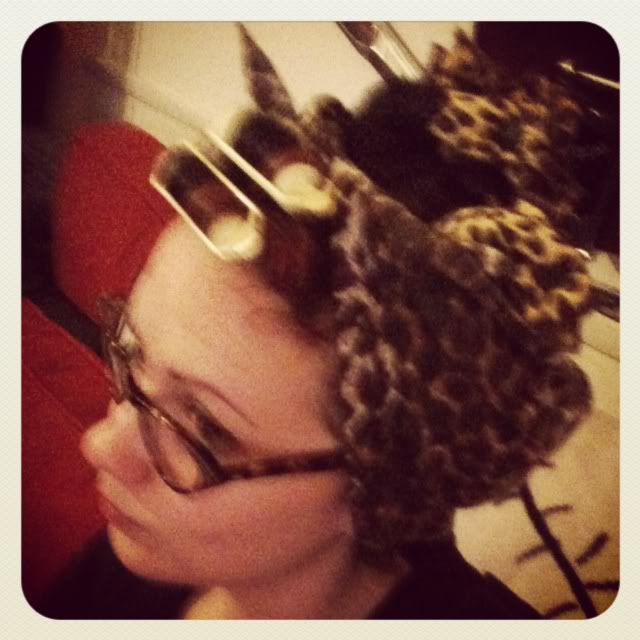
They are sort of a combination of rag rolling and foam rollers. My hair is already naturally curly but sometimes I just need a different type of curl. These rollers are so great. They are super soft I slept in them all night without any trouble I nearly forgot they were in. I’m sure my hubby got a good chuckle I had a head full of leopard print rollers, but in the morning the results were worth it! If you’re thinking about getting them I suggest you do! These babies will save me a ton of time in the mornings! I’m going to play around with them a bit this next week then I’ll do a tutorial but they are so easy to use, its all in the name… want to see what all the rave is about?…here it is…
all I had to do was take them out finger comb my curls out and tie a ribbon in my hair! 

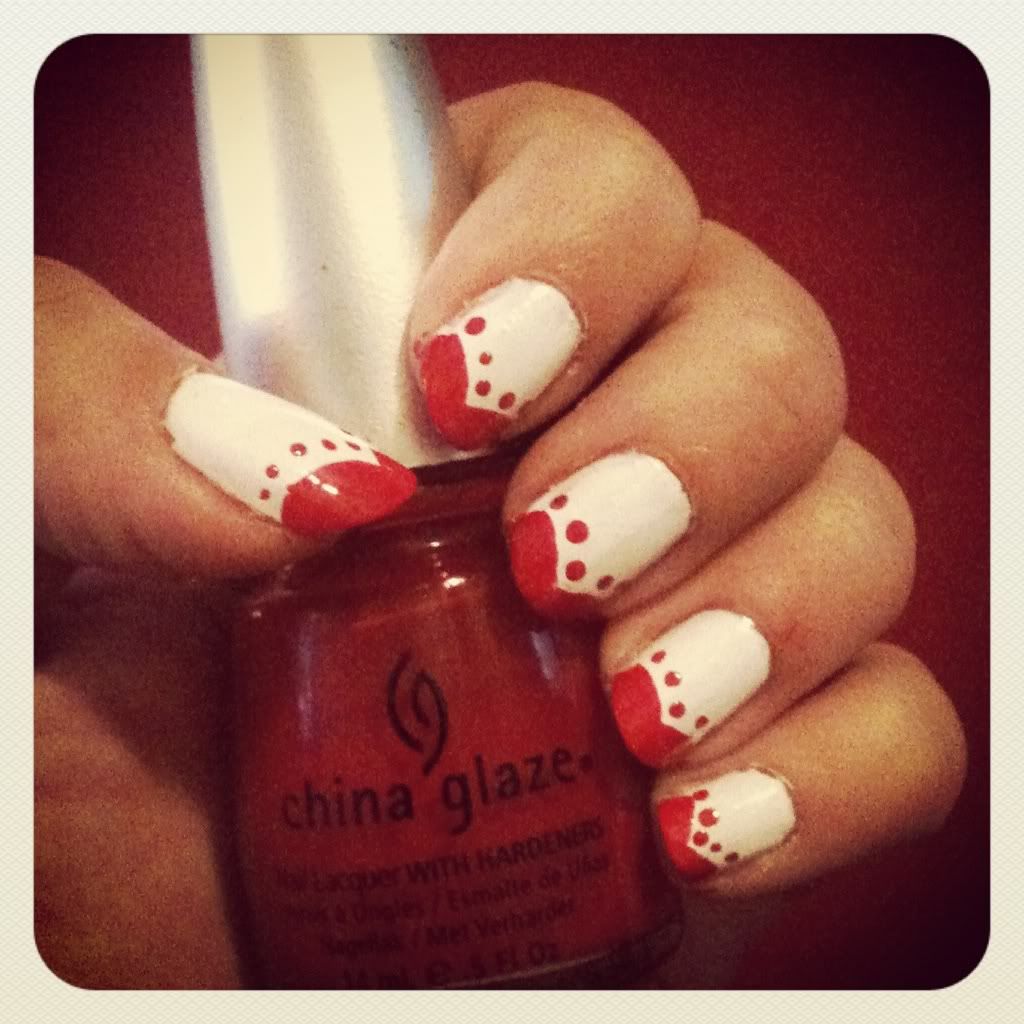
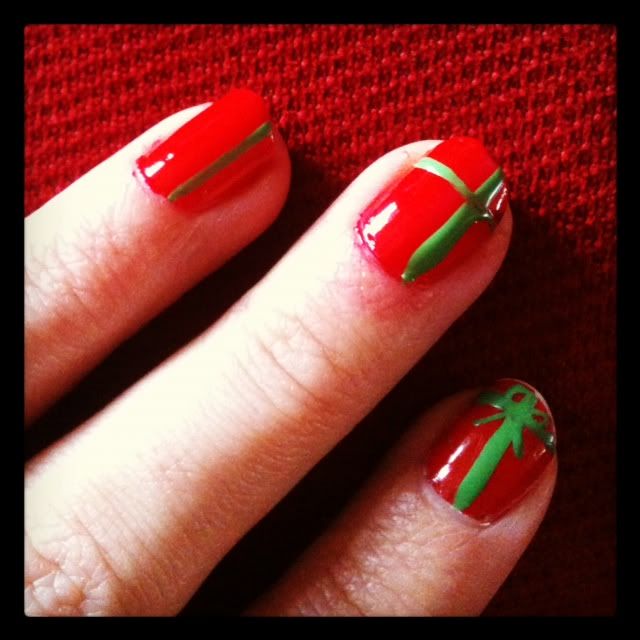
Okay and for the nails, my hubs got me this amazing book for Christmas it’s called Vintage Hairstyling. I know, I know a book of hairstyles inspired my nail tutorial, it happens. It’s full of beautiful photos, great hairstyles with tutorials, techniques and tips. I’m constantly playing around with retro and vintage hairstyles…I just love them so much!  Well in the book I came across the bare moon nail, aka half moon manicure…I’m such a huge fan of this, It can be so elegant and beautiful… so here is a really easy way of doing this and I wanted to share it with you!
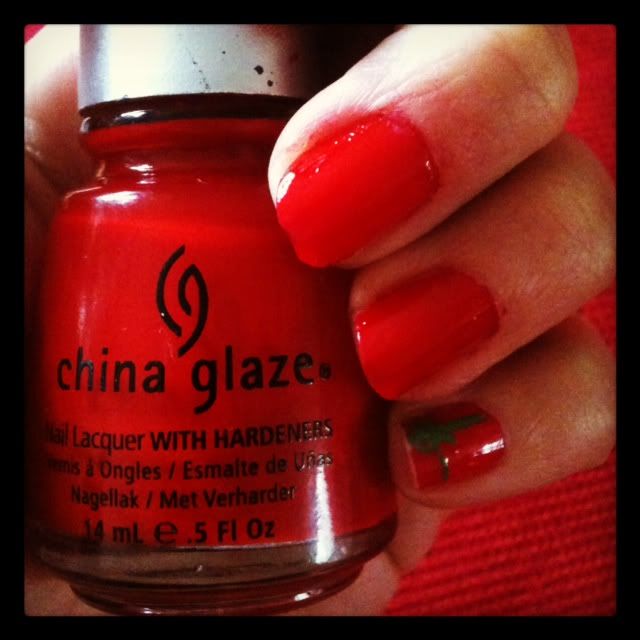
There are two variations of this we will start with the basic bare moon…
If you want to achieve this look 


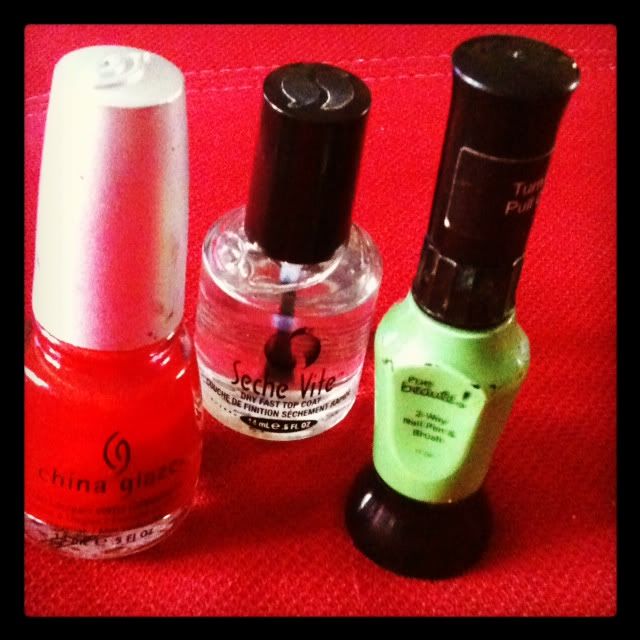
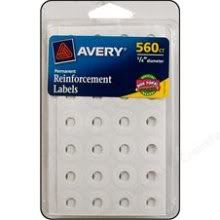
But first here is what you’ll need red polish, reinforcement stickers (you know those little circular stickers used to stop paper from ripping in your binder ->
 you can find these at most dollar stores and in the office/ stationary supply section in Wal-Mart/ Target)and a top coat!

You’re going to start with clean, bare, and filed nails.
Then you’ll want to place a reinforcement sticker on each nail, sort of like the shape of the moon of your nail. Quick tip: Cutting a slit in each sticker will allow the stickers lay more evenly on your nail. Press down on each one, making sure they are on your nail good!  If you don’t have any stickers (neither did I) just skip to the next step and I’ll explain more there…
Now paint the rest or your nail with 2 coats of red polish. Let it dry really well. For those of us who had no stickers this is what you will need to do, Just grab an old rounded eye shadow brush that you don’t use anymore or rounded paintbrush dip it in your nail polish remover and clean up the moon of your nail. If you used stickers once the polish is nice and dry slowly peel off the stickers.
Finish off with your top coat and voila! Bare moon nails.
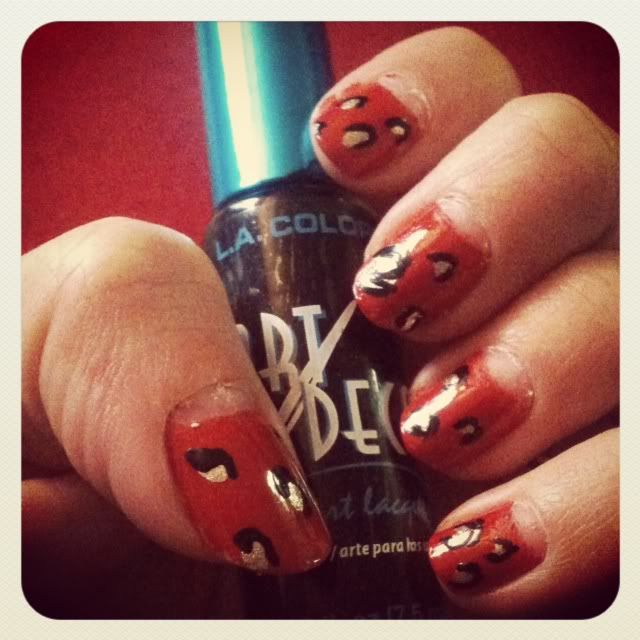
Now I wanted to do a little something more so I painted on some leopard spots like this…

Either way they are both fun and unique!
So there you go! An incredibly easy way to jazz up your normal nail polish routine!
I’d love to hear what everyone thinks! 

Photobucket

Friday, December 23, 2011

Go Go Retro

Hiya everyone! 
I love all things retro so this was really quite fitting… Today I noticed my vanity was getting a bit unorganized and my nail polish was all over the place. It was about time for me to do my nails anyhow and I came across this fantastic mint color (Hint of Mint Nicole by O.P.I.) I purchased quite some time ago. Then I came across a tad of green I had left, not sure what the color was some cheap stuff I saw at hot topic on clearance. I decided to just dump the tiny bit of green I had left into the mint it was far too sheer for my taste. The color it made was this really great retro mint. So I decorated my nails for Christmas,. I got a lot accomplished, organized my vanity and retro-fied my nails.
 There they are! Mint with Candy stripes and red star burst/ snowflakes!

Oh! And came across a rockabilly Christmas CD I made last year which consisted of some of my favorite Christmas songs…

Mama's Twistin' With Santa - Mark Anthony
Rock'n Roll Santa - Little Joey Farr
Run Rudolph Run - The Outlaws
I want a hippopotamus for Christmas- Gayla Peevey
I Wanna Spend Christmas With Elvis - Marlene Paul
Santa's Got a Coupe de Ville - The Four Imperials
Big White Cadillac - Little Joey Farr
And more, but I can’t think of them all right now.
So it worked out nicely.


Well that’s about all my rambling for now… Until next time.
Photobucket

Wednesday, December 21, 2011

a spoonful of sugar...

or just a  mouthful of peanut butter chocolate deliciousness!

So I know this is a bit off topic but since I enjoy sharing my favorite things with you all I wanted to share my great grandpa’s buckeye recipe!  I just made a big batch of these delicious candies. If you haven’t had them before they are basically a peanut butter candy dipped in chocolate.  They are super easy to make and everyone will love them. (Given they don’t have a nut allergy.) These are my favorite around the holidays. Let’s just consider this my Christmas gift to y’all! So here is the recipe. ENJOY!


What you’ll need:
-1 ½ cups of creamy peanut butter
-1/2 cup of margarine/butter (room temperature)
-1 tsp vanilla
-1  16oz package of confectioners’ sugar (10x sugar)
-1 6 oz package of semi sweet chocolate chips
 -2 tablespoons of shortening
- wax paper                        

Here’s what you’ll do: (it looks like there are a lot of steps but it’s really not too bad)
1.)    First you’re going to want to line a baking sheet with wax paper.
2.)     Then go ahead and cream your peanut butter and margarine.  Then mix in the vanilla and sugar. But be careful! especially when using an electric mixer! Mixing powdered sugar can be quite a mess! if you have little patience like me and just turn it on poof! you're covered and its snowing powdered sugar! It’s going to form stiff dough.  (I have a Kitchenaid mixer I use the flat beater or dough hook, but my great grandpa swore mixing it by hand was the best.)
3.)    Now you’ll take about 1 tablespoon of dough and shape them into balls and place them on the wax paper lined baking sheet.

4.)    Once you’re done with that go ahead and place them in the refrigerator for now.
5.)    Next if you don’t have a double boiler make sure to melt the chocolate at a low heat to prevent burning it.  I use a double boiler or rather two pots stacked atop each other with water in the bottom one. Place the chocolate chips and shortening in the pot (the top pot with out water) stirring until melted and smooth. Remove from heat. 
6)    Remove the peanut butter balls from the refrigerator and use a toothpick to dip each ball into the melted chocolate and place back on the sheet. One you’ve dipped them all refrigerate 30 minutes or until chocolate is set.
This recipe freezes well so fell free to make it ahead of time and store in a freezer safe storage container! Enjoy!

Photobucket

Tuesday, December 20, 2011

Christmas Nails!


Hiya!
As you have probably noticed the blog has changed a bit...That's because there's a new kid in town. My name is Kitty I’ll be contributing to the blog now! I’ll try to post at least once a month, hopefully more. I’m always trying new things with my nails, hair, and makeup. thanks to my hubby for spoiling me with all the nail polish I want and I get dozens of people asking how I do them, so here we are. What better way to show everyone? I’m new to this whole blog thing so bare with me. I’d like to hear any questions, comments, or requests. Okay so let’s get right to my first tutorial! 
(Nervous and excited... hope you like it.)

 Christmas is right around the corner! 4 days to be precise, But don’t fret it’s not too late to get your cute festive nails on!  This idea is a little something different and the EASY factor is GREAT....I even do it with my left hand and I'm right handed.

So first we are just going to start off by painting all of our nails red. I love red polish and have at least a dozen to choose from. Here I used Ruby Deer by China Glaze. (two coats!)


Then I simply took one of my polishes for nail art with the thin brushes i usually find them at random stores for fairly cheap and they work well. This was the only green i had. Then i drew thin lines to make my nails look like presents. (you could also use silver, white, or whatever your preference.) like this...


 then for the bows I just did whatever felt comfortable, triangles, half circles then two little lines for the ribbon ends. 

once they were all dried I applied my top coat! 

Here are the products I used:
red - China Glaze: Ruby Deer
green- rue beaute` nail polish pen
Top coat - Seche Vite


And that's it! now if only Christmas shopping were that easy...
I doubt I'll have time to post again before Christmas, so Happy Holidays! Hope you enjoyed the tutorial. 


Photobucket